Last night I made a few more flowers while watching
The Manhattan Murder Mystery


Some of you have asked how to make your own.
Well, I must start by saying that I did NOT invent this flower
Though I'd love to take credit.
Here is the girl who showed me how to make them.
I just tweaked it from there.
So you can either follow her tutorial, or mine, but hopefully,
either way, you can create your own and enjoy!
How to make a Felt Dahlia:
Start by making a template for your petals.
I folded part of card stock paper in half and cut one side of a large petal.
My largest is 2 1/2 inches
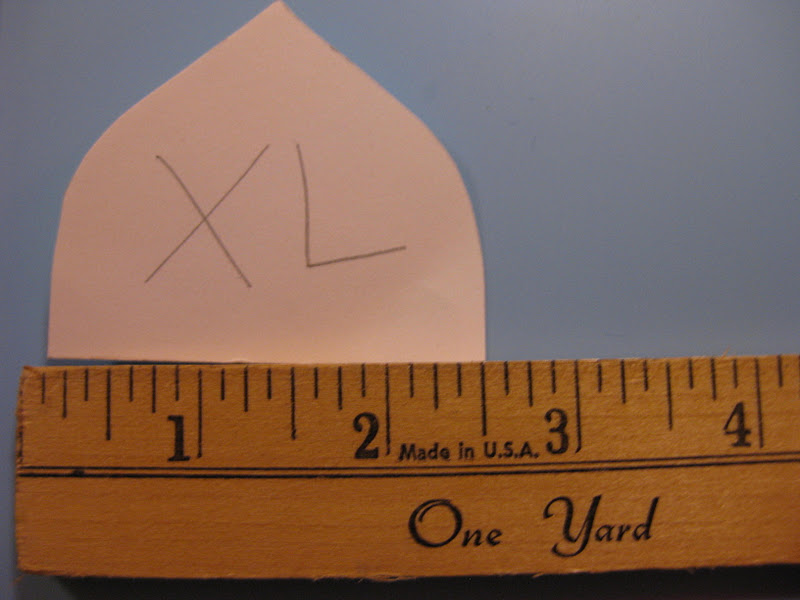
The 2 1/2" petal base will make one right at 6 inches in diameter,
That's one large flower :)

Taking my large petal, I traced it on card stock and kept the traced one for permanent use.
Taking the folded one, I refolded it and cut off one centimeter along the outside of the petal.
{Making it 2cm smaller than the other}
Then I traced it and kept the tracing.

Taking my folded one again, I refolded it and again, cut off 1 centimeter following the outline.
Each time I do this, I trace out the image so that I can have one for keeps.

Then I took off more...

And more...

And more...

And more.

Cut out all of your tracings and keep them for future projects.
I used card stock because it would hold up for multiple uses.
I might use stencil paper next time for longer lasting copies.
Now that we have our templates, lets get started!
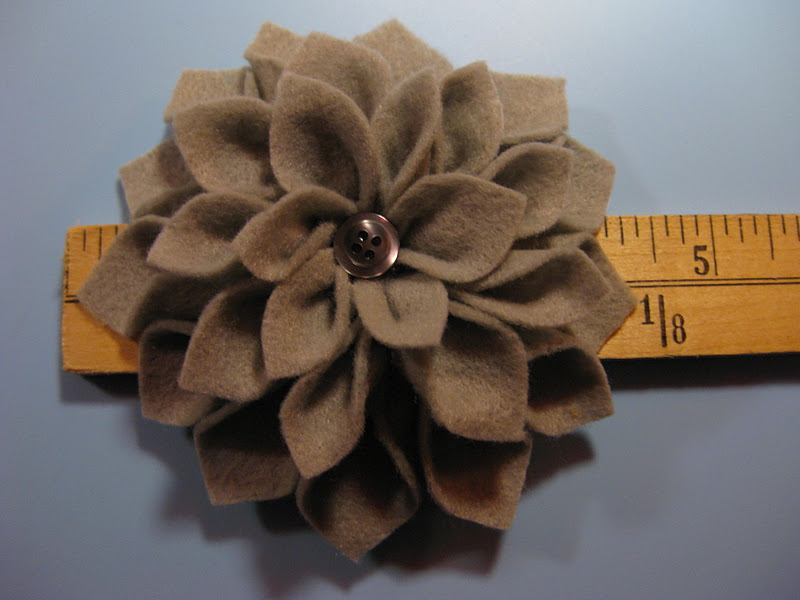
For this flower, I used my small, xsmall, and xxsmall petals.
This will give me a flower that is just about 4 1/2 inches in Diameter.

Cut strips of felt the width of your petals.
I used a sheet of felt from the craft store that is 9x13" and cost 29 cents.
Each strip was 9"s long.

I cut 3 strips for my bottom petals using my small template.
{Turns out for this flower, I only needed 2 of the larger strips}
2 strips with my xs template
And 1 strip with my xxs template.
I then cut a circle 2" in diameter.

I like to stack all of my same-sized strips together, pin them to keep in place
and then cut them out. It saves time :)

Apply a small dot of hot glue to the bottom corner of the petal.
{Sorry for the detailed, grody picture of my glue gun, she and I have come a long way together and she only cost a buck!}

Pinch the 2 bottom corners together...

Then quickly smoosh in the bottom, so that you have 3 points on the bottom.

You now have one petal.
Continue making the rest of them.

Now attach your petals to your circle.
Apply 1 dot of glue to the bottom back of your largest petal.

Stick the largest size petal to your circle, let if hang off your circle.
Only about 2 centimeters need to be on the circle.

Working around the circle, keep adding the petals.
I overlap the flat edges.
Be sure to angle a bit so you make a circle ;o)

This is what your first circle should look like:
{I used 13 petals for the largest row}

Now start your second row using the next size down petals. Attach it the same way. A little bit in from the larger row and work your way around again.

When I'm making small petals, instead of a dot of glue that usually gets messy
I'll do a thin smeared line of glue.
It's less visible at the end.
{And I burn my fingers less}

The second row of petals:
{9 petals for mine}

Add your smallest petals to the final row the same way you did the others. Sometimes you have a small circle left in the middle, this time I didn't It doesn't matter
{6 petals for my center, I normally have all odd numbered rows}

Now play around with ideas for the center...
{I wish I had a nice collection of vintage buttons to work with but I don't}


Once you have the look you like, hot-glue that baby to the middle!
Don't forget to add a brooch pin or hair clip to the back.
And there ya go, a 4 1/2 " dahlia made by YOU!
If you're wondering what they look like with just 2 rows of petals:

I made these 2 with my smallest sized petals

To make a rosette type center:
Cut a long strip of felt
This one is 2 cm wide and 6 inches long
{Depending on the amount of space you have in the middle, you may want to make it longer or shorter}

Roll it into a circle,
Dab a large amount of hot-glue over the entire back
Then stick it in your flower's center while it's still hot.
Push down and your done!

I hope this tutorial was helpful!
Please show me your results if you decide to make your own.
Have a lovely day...
Well, it just started raining and it's chilly outside
Seems like the perfect time to make one with a good movie :)
4 comments:
love it however would like one made by your hands. LOL
Awesome!!! Now I just have to find the felt! Thank you!
Candi, you can find felt at any craft store or fabric store. Can't wait to see how it comes out!
Made a couple last night. I used Fabric-Tac glue. Do you like the glue gun better. Thanks for sharing!
Post a Comment